Thursday 13 November 2008

Getting USGS Earthquake Data into Android

This is the second instalment on how to display USGS Earthquake data on Android. The last post dealt with displaying the data, this post with getting it.

Here we use the USGS RSS feed containing the last day or so of earthquakes, which is available here. This is a standard XML document, which I decided to parse and store in a content provider, which hides a SQLite Database. I do not show the content provider here, but it stores some text, the magnitude and the location. I decided not to update the database, but to wipe it clean every time. While it is possible to add to existing earthquake data, care must be taken, because the USGS updates data on earthquakes it has reported on earlier, so for some quakes an insert is required, for others an update. Here I want to get only the latest data, so I can afford to wipe the data.

I decided to implement it as a service that schedules a task using the Java Timer class. My runnable gets the feed, parses it and builds up info on the earthquakes. This is then, in a separate step, inserted into the database, where it is picked up from the Overlay as explained in the last post. The parser is simply a SAX parser that implements a little state machine and accumulates all the earthquake info from the feed (some questions to USGS: why not put magnitude and time stamp into a more readable format in their own elements? I am pretty sure most people want this.)

The schedule task looks like this:

private class Task extends TimerTask {
URL url;
SAXParser sp;
XMLReader xmlReader;
USGSHandler handler;
public Task() {
handler = new USGSHandler();
try {
url = new URL("http://earthquake.usgs.gov/eqcenter/catalogs/1day-M2.5.xml");
SAXParserFactory spf = SAXParserFactory.newInstance();
sp = spf.newSAXParser();
xmlReader = sp.getXMLReader();
xmlReader.setContentHandler(handler);
xmlReader.setErrorHandler(handler);
} catch (IOException e){
Log.e(TAG, e.toString());
} catch (SAXException e){
Log.e(TAG, e.toString());
} catch (ParserConfigurationException e){
Log.e(TAG, e.toString());
}
}
@Override
public void run() {
Log.e(TAG, "refreshing earthquakes");
handler.reset();
try {
xmlReader.parse(new InputSource(url.openStream()));
} catch (IOException e) {
Log.e(TAG, e.toString());
} catch (SAXException e) {
Log.e(TAG, e.toString());
}
List quakes = handler.getQuakes();
getContentResolver().delete(EarthquakeContentProvider.EarthquakeData.CONTENT_URI, "1 = 1", null);
for (Earthquake e : quakes){
ContentValues values = new ContentValues();
values.put(EarthquakeContentProvider.EarthquakeData.TEXT, e.mText);
values.put(EarthquakeContentProvider.EarthquakeData.LON, Math.round(e.mLon * 1.e6));
values.put(EarthquakeContentProvider.EarthquakeData.LAT, Math.round(e.mLat * 1e6));
values.put(EarthquakeContentProvider.EarthquakeData.MAGNITUDE, e.mMagnitude);
getContentResolver().insert(EarthquakeContentProvider.EarthquakeData.CONTENT_URI, values);

}
}

}

As usual lousy error handling.

Displaying USGS Earthquake Data on Android


The United States Geological Survey (USGS) has a helpful RSS feed for earthquakes all around the globe. You can find the various feeds here. Here I illustrate how to load the data and display them as an overlay on Google maps on Android.

The principal way I have chosen is to have a service running in the background that periodically gets the latest earthquakes and stores them in a ContentProvider. The map overlay queries the ContentProvider for the earthquakes for the given map extent.

We start off with the display. The display is an overlay that redefines the draw() method. There are two steps: first to get all the earthquakes from the content provider, secondly drawing them (with a bit of hint on the magnitude).

Finding all earthquakes is easy, bar the pain of accommodating that map views can span the dateline, where the query to the content provider gets a bit more difficult. First I thought that simply changing the where clause according to the left hand side longitude being smaller than the right hand side longitude was sufficient, but then it turned out that one can zoom out so much that the right hand side longitude is larger than the left hand side, but the map still contains the dateline. I handle this case by checking if the longitude span is larger than 360 degrees. That means that earthquakes regardless of longitude need to be returned. (The same does not apply to latitude: Google maps always just cuts off at 80 degrees and does not wrap around. (For engineers of the Google phone the world seems to be a wrap-around band. They seem to smoke weird stuff down in California, but I guess it makes their life a bit easier.)

Once I have all the earthquakes, I iterate through the list and display them according to magnitude: one degree of magnitude gets one circle and using the zoom-level I scale this a little bit, so that the concentric circles get smaller if one zooms out, resembling a bit an impact zone.

This is the code in all its glory:

import android.database.Cursor;
import android.graphics.Canvas;
import android.graphics.Paint;
import android.graphics.Point;
import android.util.Log;

import com.google.android.maps.GeoPoint;
import com.google.android.maps.MapView;
import com.google.android.maps.Overlay;
import com.google.android.maps.Projection;

class EarthquakeOverlay extends Overlay {

public final static String TAG = "EarthquakeOverlay";

EarthquakeOverlay(){}

@Override
public void draw(Canvas canvas, MapView mapView,
boolean shadow) {
super.draw(canvas, mapView, shadow);
GeoPoint[] cornerCoords = MapUtils.getCornerCoordinates(mapView.getProjection(), canvas);
String selection;
if (mapView.getLongitudeSpan() >= 360 * 1e6){
selection = EarthquakeContentProvider.EarthquakeData.LAT + " < " + ((Integer)cornerCoords[0].getLatitudeE6()).toString() + " and " +
EarthquakeContentProvider.EarthquakeData.LAT + " > " + ((Integer)cornerCoords[1].getLatitudeE6()).toString();
} else if (cornerCoords[0].getLongitudeE6() < cornerCoords[1].getLongitudeE6()){
selection = EarthquakeContentProvider.EarthquakeData.LAT + " < " + ((Integer)cornerCoords[0].getLatitudeE6()).toString() + " and " +
EarthquakeContentProvider.EarthquakeData.LAT + " > " + ((Integer)cornerCoords[1].getLatitudeE6()).toString() + " and " +
EarthquakeContentProvider.EarthquakeData.LON + " > " + ((Integer)cornerCoords[0].getLongitudeE6()).toString() + " and " +
EarthquakeContentProvider.EarthquakeData.LON + " < " + ((Integer)cornerCoords[1].getLongitudeE6()).toString();
} else {
selection = EarthquakeContentProvider.EarthquakeData.LAT + " < " + ((Integer)cornerCoords[0].getLatitudeE6()).toString() + " and " +
EarthquakeContentProvider.EarthquakeData.LAT + " > " + ((Integer)cornerCoords[1].getLatitudeE6()).toString() + " and ( " +
EarthquakeContentProvider.EarthquakeData.LON + " > " + ((Integer)cornerCoords[0].getLongitudeE6()).toString() + " or " +
EarthquakeContentProvider.EarthquakeData.LON + " < " + ((Integer)cornerCoords[1].getLongitudeE6()).toString() + ")";
}

Projection p = mapView.getProjection();
Cursor cursor = null;
Paint paint = new Paint();
paint.setStrokeWidth(0);
paint.setStyle(Paint.Style.STROKE);
try {
cursor = mapView.getContext().getContentResolver().query(EarthquakeContentProvider.EarthquakeData.CONTENT_URI, null, selection, null, null);
if (cursor != null) {
cursor.moveToFirst();
while (!cursor.isAfterLast()){
GeoPoint gp = MapUtils.geopointFromLatLongE6(cursor.getInt(EarthquakeContentProvider.EarthquakeData.LAT_CN), cursor.getInt(EarthquakeContentProvider.EarthquakeData.LON_CN));
Point point = p.toPixels(gp, null);
Float magnitude = cursor.getFloat(EarthquakeContentProvider.EarthquakeData.MAGNITUDE_CN);
canvas.drawPoint(point.x, point.y, paint);
int zoomLevel = mapView.getZoomLevel() + 1;
for (int i = 0; i < magnitude; i++){
canvas.drawCircle(point.x, point.y, i * zoomLevel, paint);
}
cursor.moveToNext(); }
}
} finally {
if (cursor != null){
cursor.close();
}
}
}
}

How to get the data from USGS follows in one of the next posts...

Monday 3 November 2008

An Editable Waypoint Layer

A GPS without waypoints is like an Android without Activities, so here I illustrate what needs to be done to add an editable waypoint layer to Android.

First of all we need a waypoint content provider, which is just a wrapper around a database table. I am not planning to elaborate on this here as it is just another content provider.

We start with the map. The idea is just to tap on the map at the location where we want to position the waypoint. However, this conflicts with the usual use of touch to pan the map around. I worked around this by having a button on the map that puts the map in different modes. One is the panning mode, another the editing mode for (right now just) adding waypoints. At startup the map is in panning mode. Once a user clicks the button it toggles into editing mode and the next touch will create a waypoint and start the waypoint editor. This is how this looks:

This is all easily done within the onClick() method on the map:

protected synchronized void setDrawingMode(boolean drawing){
Button button = (Button)findViewById(R.id.modeButton);
if (!drawing){
drawingMode = false;
button.setText("Add Waypoint");
} else {
drawingMode = true;
button.setText("Pan");
}
}

@Override
public void onClick(View v) {
setDrawingMode(!drawingMode);
}


Now my onTouch() method distinguishes between the drawing and panning mode and when in editing mode takes the current location and call the waypoint editor (which is hard-coded here, would be better with intent negotation):

public boolean onTouch(View v, MotionEvent event){
if (drawingMode){
setDrawingMode(false);
MapView mv = (MapView)v;
Projection p = mv.getProjection();
GeoPoint point = p.fromPixels(Math.round(event.getX()), Math.round(event.getY()));
ComponentName comp = new ComponentName(this.getPackageName(), WaypointEditor.class.getName());
Intent intent = new Intent().setComponent(comp);
intent.putExtra(WaypointEditor.LAT, point.getLatitudeE6());
intent.putExtra(WaypointEditor.LON, point.getLongitudeE6());
startActivity(intent);
return true;
} else {
return false;
}
}

You might have noticed that I set the drawing mode to false as soon as the onTouch() call happens. This is because quite often I get more than one touch event from what my clumsy fingers believe is a single tap. We catch only the first, the last ones will be translated into panning events again.

I will not show the waypoint editor here, but waypoints are shown through an ItemizedOverlay, more or less as it comes out of the box. But waypoints should be editable as well, so I override the onTap() method on the ItemizedOverlay:

@Override
protected boolean onTap(int index) {
Waypoint i = items.get(index);
ComponentName comp = new ComponentName(WaypointEditor.class.getPackage().getName(), WaypointEditor.class.getName());
Intent intent = new Intent().setComponent(comp);
intent.putExtra(WaypointEditor.ID, i.id());
context.startActivity(intent);
return true;
}

Saturday 1 November 2008

Selecting WMS Layers

WMS (Web Map Services) provide a standard means of downloading maps from the internet and a MapActivity allows to layer maps obtained this way onto the Google baselayer. The mechanism of this was a bit explained in a previous post, but here I want to talk a bit about managing a number of user selectable WMS Layers.

  1. First of all WMS servers provide all the information about their maps in a capabilities document, an XML description of maps and their properties provided by that server. Every user-downloadable map comes as a Layer element in that document. So if we give users the ability to put in the base url of an WMS server, parsing the document for available layers is not so hard and can be done with an XmlPullParser. The base URL for such an WMS Layer is the URL in the picture, for the ICEDS server hosted at University College London. This is the complete URL for the capabilities document from that server: http://iceds.ge.ucl.ac.uk/cgi-bin/icedswms?service=wms&version=1.1.0&request=GetCapabilities.
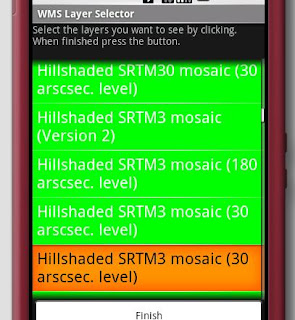
  2. I have quite a simple pull parser that will not trap all errors and such, but is good enough for a start to extract all the layers. These are then displayed in a ListActivity, which has a ListAdapter to display the layer titles:

    public void onCreate(Bundle savedInstanceState){
    super.onCreate(savedInstanceState);
    setContentView(R.layout.wmslayerselector);

    Button b1 = (Button) findViewById(R.id.button);
    b1.setOnClickListener(new View.OnClickListener() {
    public void onClick(View arg0) {
    finish();
    }
    });

    Intent intent = getIntent();
    String wmsUrl = intent.getExtras().getString("wmsurl");
    WMSService wmsservice = new WMSService(wmsUrl);
    layers = wmsservice.getLayers();

    ListAdapter adapter = new ArrayAdapter(
    this, // Context.
    android.R.layout.simple_list_item_1,
    layers); // Pass in the cursor to bind to.

    // Bind to our new adapter.
    setListAdapter(adapter);
    }


  3. My onListItemClick() then inserts the selected layer into a ContentProvider for future use:

    @Override
    protected void onListItemClick(ListView l, View v, int position, long id) {
    WMSLayer layer = layers.get(position);
    Log.e(TAG, layer.toString());
    ContentValues values = new ContentValues();
    values.put(WMSLayerContentProvider.WMSLayerData.TITLE, layer.getTitle());
    values.put(WMSLayerContentProvider.WMSLayerData.NAME, layer.getName());
    values.put(WMSLayerContentProvider.WMSLayerData.BASEURL, layer.getBaseUrl());

    getContentResolver().insert(WMSLayerContentProvider.WMSLayerData.CONTENT_URI, values);}

    (There is a little issue with that WMS Server: technically, all layers with a NAME should be displayable, but this servers has some layers with names that are just used for grouping and will just display an error message when requested).

    Whenever I display a map, it now checks for those added WMS Layers:

    protected void loadWMSLayers(){
    List overlays = view.getOverlays();
    overlays.clear();

    Cursor wmsservers = null;
    try {
    String selection = WMSLayerContentProvider.WMSLayerData.VISIBLE + " = 1";
    wmsservers = getContentResolver().query(WMSLayerContentProvider.WMSLayerData.CONTENT_URI,
    null, selection, null, WMSLayerContentProvider.WMSLayerData.DEFAULT_SORT_ORDER);
    if (wmsservers != null){
    while (wmsservers.moveToNext()){
    WMSService wms = new WMSService(wmsservers.getString(WMSLayerContentProvider.WMSLayerData.BASEURL_CN));
    WMSLayer wmslayer = new WMSLayer(wms, wmsservers.getString(WMSLayerContentProvider.WMSLayerData.NAME_CN), wmsservers.getString(WMSLayerContentProvider.WMSLayerData.TITLE_CN));
    view.getOverlays().add(new WMSOverlay(wmslayer));
    }
    }
    } finally {
    if (wmsservers != null){
    wmsservers.close();
    }
    }
    }